Good morning rowers!!!
It's row along day and it's time for row 5....flying geese!
Here in Utah...
October is the time of year, when in the early morning hours...
I wake up to the sound of honking geese flying overhead.
I love that sound.
To me it signals the changing of the season and nice change in the weather.
Crisp cool mornings...
sunny Autumn afternoons...
that end with a beautiful harvest moon in the evening.
I just love fall!!!
Are you ready to play???
Good.
Let's start by choosing fabric.
Pull some bits and bobs from your stash in the colors
of your favorite fall sweaters...
Each flying goose will use 2 different fabrics...
so naturally you will choose 2 fabrics for each goose.
You can pair them up willy nilly or fuss and fret...
it's all up to you!
We will be using the "fast flying geese" method that has been around for a long time...
it's the method that I have always taught to my beginning students and it's the way that I still love to make them.
You will need 12 pairs for a total of 48 geese...
but I got a little carried away and paired up a few extra sets for even more scrappy happiness.
Okay...now onto making a set of the 2 square sizes into 4 flying geese.
First you will be marking stitching lines
onto the WRONG side of the LARGE square.
The smaller square will be the triangle in the center of the goose....
and will not need to be marked.
Use a mechanical pencil for a nice thin line.
and placed it directly across the center diagonally...
and marked a line on each side of the ruler...which means that I marked a stitching line 1/4" away from the center on each side.
Rotate your square and mark again so that it looks like this.
These are your stitching lines.
If you don't have 1/2" wide rulers...no worries.
Just use a small square quilting ruler and mark a line down the center from corner to corner...and then mark 1/4" on each side so that it looks like the lines on the aqua square.
Now that your lines are marked...
you will cut the large square into 4 smaller squares before sewing.
Cut the square exactly in half.
and cutting into 2 rectangles.
Then cut each rectangle in half so that you end up with 4 squares.
Now for the sewing.
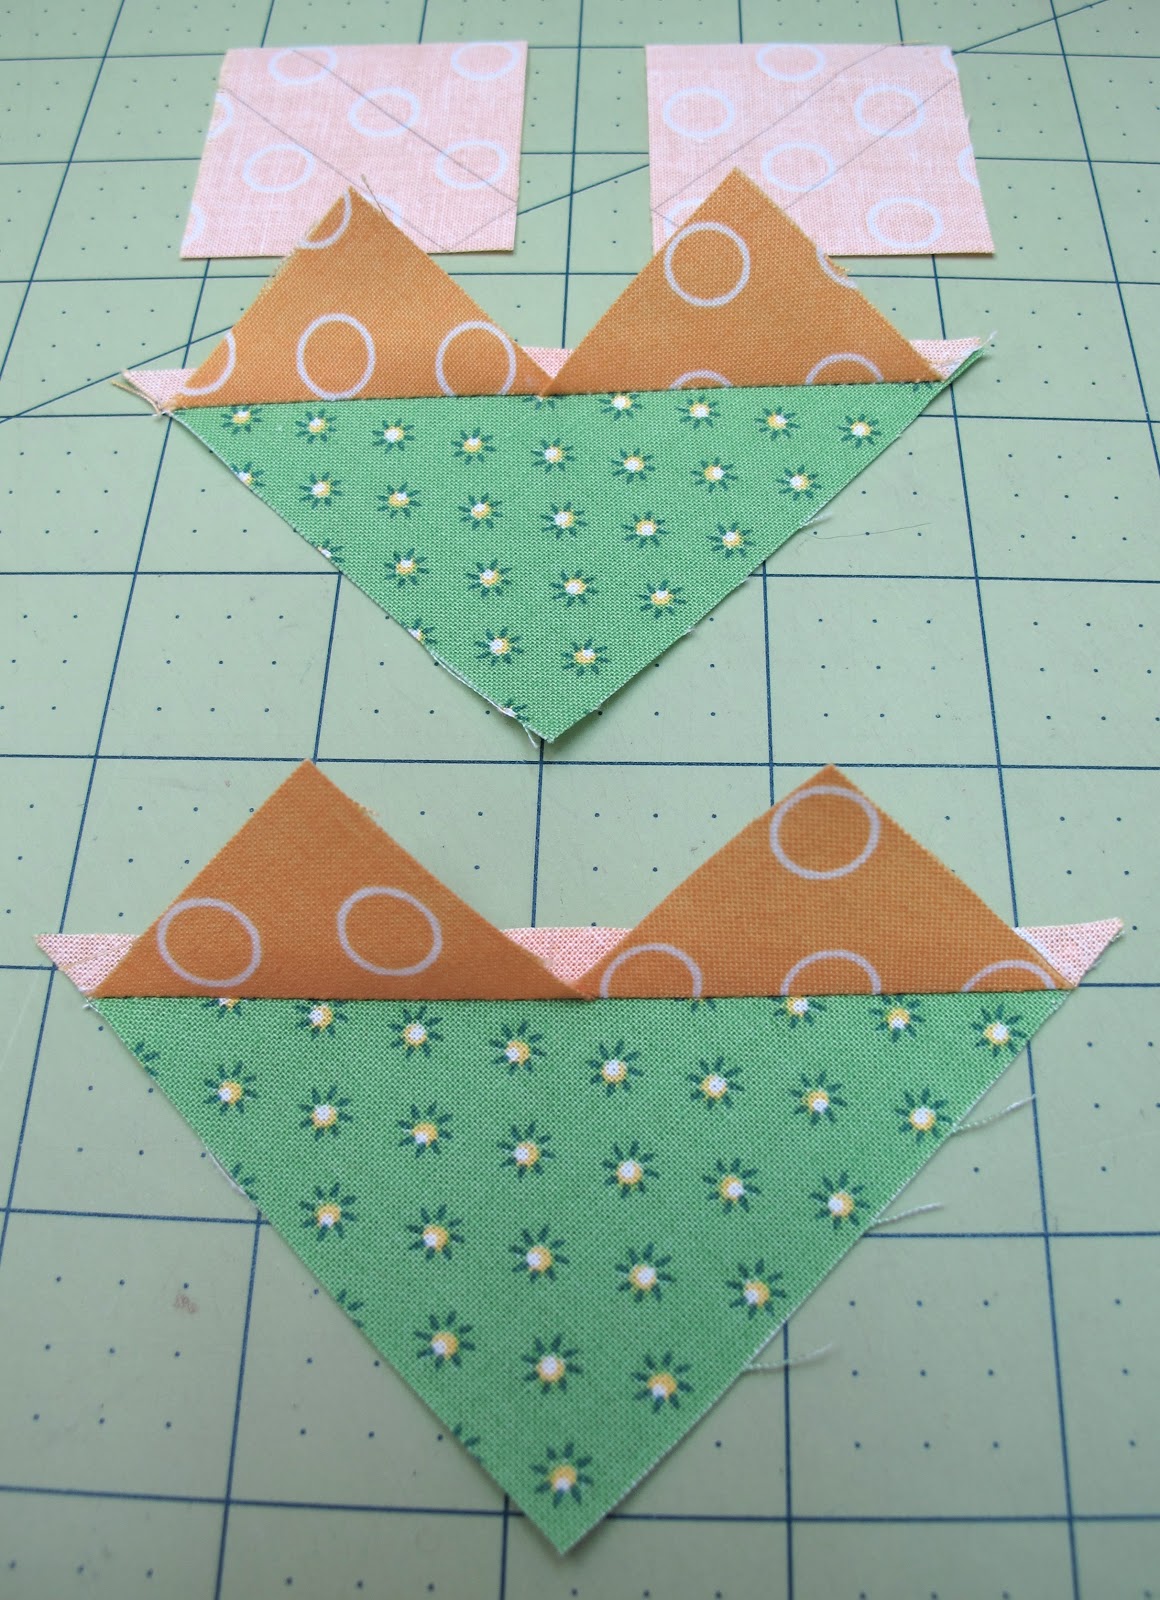
Place two marked squares onto the larger square in the set with right sides together...lining up the marked lines.
(they will overlap in the center)
Stitch directly onto the lines that you marked which are 1/4" on each side of the center.
Cut right down the middle...
in between your stitching lines...
like this.
Press towards the small triangles...
and smile at the cute heart shape:)
Now place a remaining square on each half like this.
Always make sure that the corners of both squares are lined up perfectly.
Stitch on both lines again...
and cut them apart again.
Press open...
and you now have 4 flying geese!
YAY!!!
Wasn't that fast and easy and fun to do on a fall day:)
Of course you will want to trim off all of the tiny triangles before sewing them together in a row:)
After you have made a set of 4 and get used to the process...you can chain stitch them if you would like...
Or you can do keep doing them 4 at a time if you want...whatever rows your boat!!!
(pun intended..haha)
When you are finished...
sew them together in sets of 2...
and then sets of 4...
then 8...
and continue until you have a row of
fabulous scrappy happy colorful autumn baby flying geese:)
Press all seam allowances towards the bottom of the adjoining triangle for less bulk....and be careful to use a 1/4" seam allowance so that you don't sew off the points of your goose!
Add your background strips to each end and make sure that your row measures correctly so that it will fit into your quilt:)
Flying geese + apples = a happy autumn time:-)
Our row quilt is growing...
And growing!
In 2 weeks it will be November and time for row 6.
Have a flying goose kind of day:-)
xx
Lori
***edit July 2013
The instructions and pattern for the
Bee in my Bonnet Row Along Quilt
are in my new book
"Quilty Fun"
to reserve your copy today:)